kodak

FLICKR TOP TEN - PART II

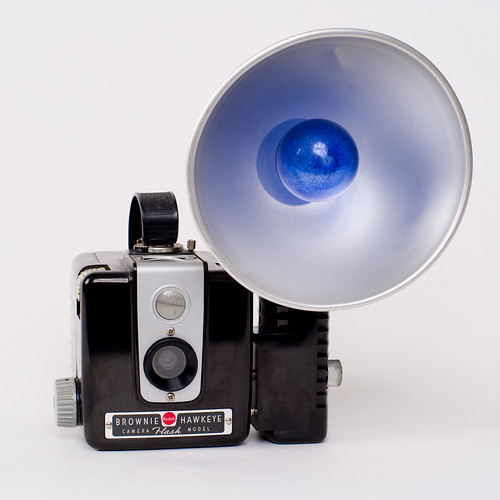
Kodak Brownie Hawkeye Flash Camera
January 13, 2011. Title: Kodak Brownie Hawkeye Flash Camera Description: Kodak Brownie Hawkeye Flash Model dates from 1950-61. Original cost for the Hawkeye was $5.50 and the flash was $7.00. Stats: 1,561 views, 4 faves, 0 comments Tags: brownie, kodak, hawkeye, camera, vintage, classic. Groups: None.
In Part II of my Flickr top ten blog post, I share photos five through ten, which in some ways are very different from the top five, however, there are also are a few similarities.

Number six, seven and ten, are some of the earliest photos I posted to Flickr and were part of a series I was working on about vintage cameras. I suppose that just given the amount of time they have been on Flickr, naturally they would accumulate views. I did notice that I was not sharing my photos to groups during this time, so realistically views could have been much higher. At some point, I did add number ten to several groups after they reached out to me with a request.

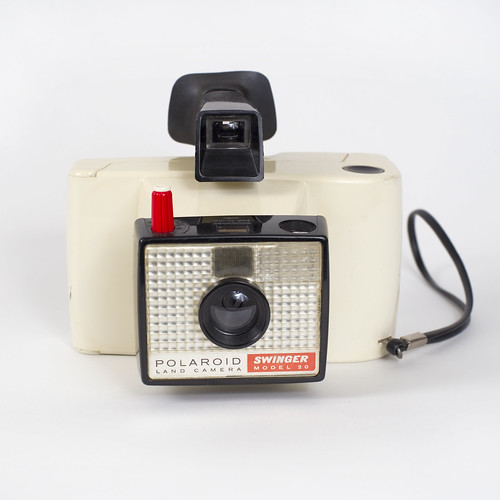
Polaroid Swinger Model 20
January 19, 2011. Title: Polaroid Swinger Model 20 Description: The Polaroid Model 20 Swinger was produced by the Polaroid Corporation between 1965 and 1970 and cost $19.95. Stats: 1,545 views, 0 faves, 0 comments Tags: Polaroid, swinger, model 20, vintage, camera, land camera. Groups: None.
Another thing about these photos is that only 400 views separate the number six photo from the number ten photo. I don't know exactly what that means, except that it stood out to me.

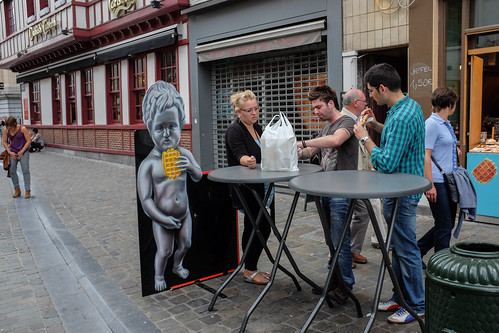
Number eight is another photo which features the Manneken Pis, although in a very different way that my number one most-viewed photo which was featured in Part I. In this photo I was focusing on the three people at the table and it was only later during post production that I notice the woman to the left.

Manneken Waffles
August 18, 2013. Title: Manneken Waffles Description: Manneken Pis is a famous Brussels landmark depicting a naked little boy urinating, and can be seen in advertising all over the city. Stats: 1,515 views, 1 faves, 0 comments Tags: X100S, Fuji, Manneken Pis, Brussels, Belguim, Belgium, advertising, coke. Groups: Fuji x100s
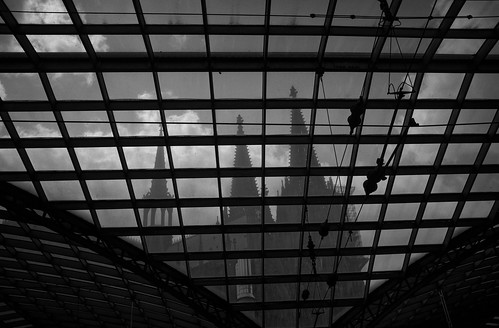
Number nine is a photo that I like, but certainly not one that I would put in my top ten favorites. I notice that many of my photos from Europe, especially those taken in Germany, do very well on my Flickr site. If I continued on down the most viewed list you would see many more photos from Germany and Belgium, including another Manneken Pis in the top twenty.

Cologne Cathedral
August 20, 2013. Title: Cologne Cathedral Description: The Cologne Cathedral is a Roman Catholic church in Cologne, Germany, and the seat of the Archbishop of Cologne and the administration of the Archdiocese of Cologne. Stats: 1,221 views, 2 faves, 0 comments Tags: X100S, Fuji, Cologne Cathedral, Germany, church, catholic. Groups: Cologne black & white, Fuji x100s, Digital Black and White.
This has been a fun two-part post to write and has given me a chance to look back over some photographs  that I posted about the same time that I relaunched this blog in 2011. I am constantly reminded how wonderful it is to have photo sharing sites like Flickr, along with social media, to get your work out there, to be shared and viewed by others. I know it has made me fall in love with photography, particularly, my personal work, all over again.

I think back to when I started taking photographs professionally in 1985 and at that time I never had any idea that my work would be seen by this many people. I'm still a small fish on Flickr, something I'm working on changing, but for now I'm content with my followers and looking at the work of those I follow.

Thank you, and let me know you Flickr username. I'll be sure to visit, leave a comment and follow you.
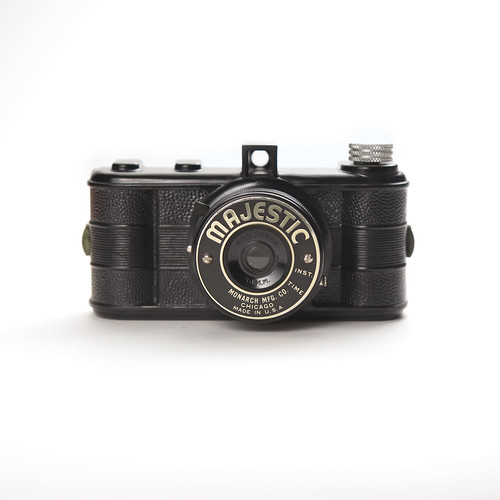
Majestic Toy Camera
July 26, 2011. Title: Majestic Toy Camera Description: Majestic toy camera from the Monarch Manufacturing Company, Chicago. Stats: 1,140 views, 2 faves, 2 comments Tags: Majestic, Toy Camera, Monarch Mfg.Co., Chicago. Groups: Historic Camera, Camera-wiki.org

EARLY DIGITAL CAMERA AND PUBLISHING FIRSTS

Tear sheet showing stand-along photo taken with the Kodak DCS 460 as it appeared in the May 11, 1996 Philadelphia Daily News. Was this a first?
Tear sheet showing a stand-alone photo taken with the Kodak DCS 460 as it appeared in the May 11, 1996, edition of the Philadelphia Daily News. Was this a first?
Last year I read an article on Popphoto.com titled "The 30 Most Important Digital Cameras of all Time," and the first thing that struck me was how many of these cameras I had the opportunity to use or at least get my hands on and the second thing was how far we've come in both quality and price.

It also got me thinking about the first image I had published that was taken with a digital camera. Actually it was published twice.
The Kodak Professional DCS 460 Digital Camera was introduced in 1995.
The camera was a Kodak Professional DCS 460 which had a list price of $35,600, a 1.3x crop factor and at 6.2 megapixels was the highest resolution digital camera available at the time.

In May of 1996 I was a photo editor and producer for Philadelphia Online (now Philly.com) and was working on an interactive seating map of the Blockbuster Sony Music Entertainment Center in Camden, N.J., and since I had access to the DCS 460, I decided to use it as I photographed the stage from various sections of the arena. A great time saver over shooting on film and scanning the negatives.

On the way to the venue, I came across an accident on Spring Garden Street where a car had smashed into the front window of Panichelle's barber shop. As I drove by I thought I caught a glimpse of the barber inside continuing to cut hair, so I parked, grabbed the camera and walked back to the barber shop and started shooting photos.
Stand-alone photo as it appeared on the May 10, 1996 homepage of Philadelphia Online.
Stand-alone photo as it appeared on the May 10, 1996, homepage of Philadelphia Online. View full homepage from that day.
After I returned from the original assignment in Camden I downloaded the images from the camera and was showing a few editors the shot when one of them suggested we post it to the Philadelphia Online home page as a stand-alone photo, something we hadn't done previously. This was a first.

The other suggestion was to show it to the photo editors at the Philadelphia Daily News, where it was published as a stand-alone photo the next day.

So was this the first digital camera photo, not from a wire service, published in the Philadelphia Daily News? Hardly a case for the History Detectives, but I know if I had shot this with film, I probably wouldn't have processed it until the next day and by that time it would not have been news.

GRAB A LOUPE - A NEW YEAR WITH OLD NEGATIVES

Before and after of a black and white negative photographed with a DSLR.
Original photo taken in 1993 on Kodak TRI-X film.
This didn't start out to be the first blog post of 2013, but the more I thought about it, the more I felt that this is a perfect project to start the New Year. If you are a photographer of a certain age, you can relate to the thousands of negatives and slides that fill binders and boxes under my eaves. You remember those days don't you? You'd shoot roll after roll of film, have it processed and printed and in the end, file away all those negatives and maybe some 4x6 inch prints in shoe boxes or albums that rarely were opened or looked at again.

When I purchased my first negative scanner in 1994, I would have the color film processed and sleeved, then spend hours at the computer scanning selected frames. Many of those scanned images still live on old hard drives or Zip disks and are not of the highest resolution.

But I'm getting ahead of myself, because if you really are a photographer of a certain age, you shot black and white film, processed it in the darkroom, made contact sheets and then spent many more hours printing and spotting.

So this brings us to the digital age where you can - with only a few pieces of gear you likely already own - dig out all those old negatives and slides and share them with the world, probably for the first time.

A DSLR set to copy negatives in front of a light source.
Equipment used: DSLR, macro lens, diffused light source, tripod and light stand(s), film holder, clamps and photo processing software.
Follow these few easy steps and techniques and you will think you are back in the darkroom, minus the smell of Dektol.

And staying with the darkroom theme, just think of the light source as the enlarger head, the film carrier would serve the same function and the camera replaces the easel which held the photographic paper.

For the light source I used a 36x36 inch softbox with a continuous light source inside. I then positioned the film about a foot in front and centered on the light. To hold the negatives/slides, I used old film holders from my no longer operational Minolta digital film scanner.

I attached the film holder to a clamp and bracket which were then attached to a light stand. I used an old manual 55mm Nikor Micro lens attached to a Nikon D3S and moved the camera in as close to the film holder as a could and still focus. I set the cameras ISO to 200, shutter speed to 800, f-stop at 11. I captured the images in the raw format using a custom white balance. Initially I bracketed a few stops on either side of f-11, but did not notice any significant difference.

I photographed black and white negatives, color negatives and transparencies and imported all of the images into Lightroom and processed as follows:

Tone curve on photo shows how easy it is to change a B&W negative into a positive using Lightroom.
It's as simple as inverting the tone curve. Original photo 1994 on Kodak T-MAX 400.
In order to convert the black and white and color negatives into positives, you need to flip the tone curve as shown in the photo above. In the case of B&W negatives, once the curve is flipped you will find that the results are pretty close to perfect, especially if your original exposures were correct and the negatives have good density. I did make some fine adjustments to the shadows and highlights. In the case of color images it did take a little longer to adjust since sometimes the color shifted. I found the quickest way to get close with color negatives after flipping the tone curve was set a white and black point.


Turning a color negative into a print takes a little bit more time.
Original photo 1997 on Fujicolor Press 800 color negative film.
Since slide or transparency film is already a positive, you are done with the exception of some minor color corrections. You may have to open up the shadows and reduce the contrast a bit, but again with Lightroom or Photoshop this is a breeze.

It's what you see is what you get when using a DSLR to duplicate a transparency.
Original photo shot in 1990 on a Kodachrome 200 transparency and cropped to retain the film holder.

This really was easy to do and I'm having a blast looking back and sharing images I made over 25 years ago. Probably the most time you will spend on this project is getting caught up in looking back through the years of images and the memories that are associated with them.

Keep a can of dust off handy as well, but spotting is a whole lot easier now using Photoshop or Lightroom.

Converting negatives to positives gave me the opportunity to find a photo I had not remembered taking.
A photo of my son from 1994 shot on Ilford HP5 Plus in our backyard that I had forgotten about. 
A great tutorial along with many other scanning hardware options is available at www. shuta.org.

UPDATE: I copied a negative using my Fujifilm X10 compact camera and had acceptable results.

Fuji X10 copy of Kodak high-speed infrared film negative.
Photo taken behind the Philadelphia Museum of Art on Kodak  High-Speed Infrared film.
The setup was the same. Camera was set to manual with an ISO of 200, shutter speed of 400, and a f-stop of 5.6. I used the super macro setting on this camera which enabled me to get within inches of the negative. I noticed some distortion which was not present when using a DSLR, but otherwise the results were satisfactory.