fujifilm

A CASE FOR THE FUJIFILM INSTAX PRINTER

I never intended to purchase the Fujifilm Instax SP-2 printer, or as it is known on Amazon, the NEW Fujifilm Instax SHARE Smartphone Printer SP-2, when I visited the store the day before Thanksgiving. Don’t get me wrong, I’ve been eyeing the SP-2 for several years, and the SP-1 before that. I’ve even gone so far as to pick it up, carry it around the store, only to return it to the shelf prior to checking out.

I suppose I could never make a case for why I needed it, other than it was cool tech. Another reason was price. It always seemed to be just a bit too expensive. Well with the release of the Fujifilm Instax SP-3 (larger print size) and a whole line of Instax cameras, the price has been coming down. So when I saw it on a shelf last week for $90.00, and armed with a 20% coupon, I finally pulled the trigger and purchased it.

Before I continue with how incredible this product is and how I have already put it to real-world use, let me explain exactly what the SP-2 is for those of you who may also need to find a reason to get one.

The SP-2 pairs with your smartphone via the Instax SHARE app and lets you print any photo to Instax mini film. And just like the Polaroids of the past, or present, all you do is wait a few minutes for the film to develop and you have a 1.8” x 2.4” photo framed on a 2.1” x 3.4” card. Perfect for sharing.

When I was in New York City for the Photo Plus Expo the first place I visited was the Fujifilm Wonder Photo Shop located at 176 Fifth Ave., right across from the Flatiron Building. If you want to explore the entire Instax lineup in one place, this is it.

With most Fujifilm X cameras, you can also print directly from your camera without going through the app. The only disadvantage is you lose the ability to edit your photos or use any of the features offered in the smartphone app.

Additionally, through the app you can sync with Facebook, Instagram or Dropbox and print those photos. Finally, you can always print photos from your DLSR or computer hard drive, you just have to move them to your phone first.

A few other observations before I get on with my story. It is smaller that I expected, which makes it easy to add to your camera bag. There are also many options when choosing film, including monochrome, black frames and frames for all kinds of occasions. Speaking of film, or the real question, what is the cost per print? Your best bet is to purchase twin packs, which gives you two packs of 10, or 20 images total, for about $.80 a print if you shop around.

Back to my story. On the day after Thanksgiving I visited my 94-year-old grandmother at the Masonic Village just outside Philadelphia. After chatting for a while she asked if I had my camera with me because she wanted me to photograph a friend who was only a week away from her 100th birthday. I grabbed my camera and made a half dozen photos of her friend and also a few photos of them together. Just as I was promising to send her some prints, I suddenly remembered the new Instax printer in my backpack.

You can imagine the surprise on my Grandmother’s face as I printed a photo of her friend and another of the two of them. Then printed duplicates. Instant satisfaction and instant smiles for all of us. In that moment it hit me, just how powerful a tool this printer is. And it took me finally purchasing one to truly realize it.


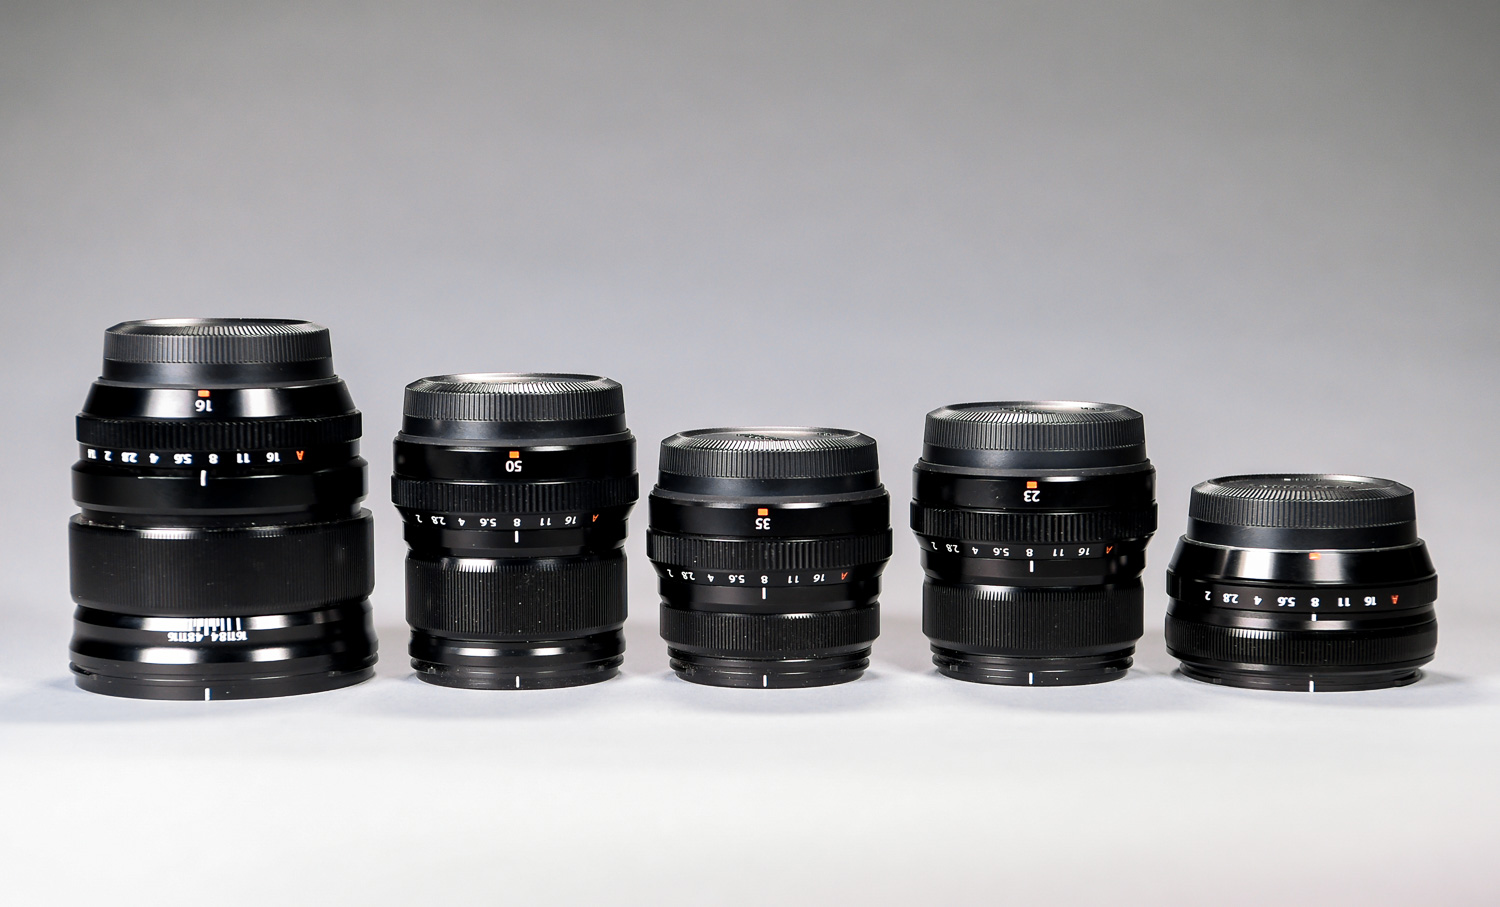
FUJINON LENS DILEMMA, OR PROBLEM, OR...

From left: The Fujinon 16mm, f1.4; 50mm, f2.0; 35mm, f2.0; 23mm, f2.0; and 18mm, f2.0.

I'm not sure how it happened. Of course, it started with one lens, the Fujinon 35mm lens which I purchased at the same time as my Fujifilm X-Pro2 camera. Then the desire to go wider, combined with a rebate, led me to purchase the Fujinon 16mm lens. Somewhere along the way I became aware of the Fujinon 23mm lens, followed closely by the Fujinon 50mm lens.

Now I've acquired the Fujinon 18mm lens. That's when I realized I might have a problem. Or more accurately, a dilemma. Even before this recent acquisition, I was looking to pare down my lens lineup. But which one would go. I was leaning towards the 35mm, however, with the addition of the 18mm, does that mean the 23mm is the logical choice to go? 

The Fujifilm 50mm, 35mm and 23mm lenses are all f2.0 and are sometimes referred to as Fujicrons, a nod to Leica's Summicron lenses which also have an f2.0 aperture. I've also referred these three lenses as the trifecta.

But the 23mm, along with the 35mm and 50mm make up what some call the "Fujicron" lineup, a nod to Leica's Summicron lenses. In this case, the Fujicron lenses are all sharp, lightweight, sturdy and do provide an acceptable range of coverage. I also previously wrote about how the Fujinon 23mm was possibly the perfect X lens, or how the 50mm completed my kit

Before I go any further, I should mention that I've decided the 16mm will stay. I've written about it before and while it is a bit heavy and large for everyday carry, it is absolutely my go-to lens for landscape photography.

Table and Chairs, Memphis, Tenn., 2018. Fujifilm X-Pro 2 with Fujinon 18mm lens, 1/125 @ f5.6, ISO 200.

So, what about the 18mm? I love the compact size and it's the first Fuji lens I've purchased that came with a usable lens shade out of the box. On the negative side, it's a noisy lens and a bit slow when focusing as compared to my other Fuji lenses. It also doesn't have the same build feel of the other Fuji lenses, yet it doesn't feel cheap either. Obviously, I need to shoot more with this lens before I make a final decision.

If you're reading this and have an opinion, I'd love to hear it in the comments. And if you haven't realized it yet, I probably won't part with any of these lenses. What's the point? Unless, of course, another lens catches my eye.

RESETTING MY FUJIFILM X-PRO2 TO ZERO

Select USER SETTING > RESET in setup menu.

I think it is important to hit the reset button once in a while. Start over. Take a step back. Evaluate. Creatively or technically. In photography, it's popular to say that it isn't about the technology or the camera, it's about the creativity. Sometimes, however, the technology can affect the creative.

I've been shooting with my Fujifilm X-Pro2 for nearly two years. Shortly after receiving the camera I wrote a blog post titled: "Fujifilm X-Pro2 Initial Settings," and that was also the last time I took a deep dive into the entirety of the camera's menu system.

During the past few months there have been several occasions where I was seeing the photograph, but struggling with capturing what I was seeing. It seemed to be a case of technology getting in the way of the creative. Something that I never experienced before with the X-Pro2.

Over time a camera setting or two can get changed, new features are added via firmware updates (4.01 as of this blog), and before you know it, it's possible the technology no longer matches the creative. Or matches how you're used to capturing the creative.

Did I change or did the camera? I felt myself falling out of love with the camera, but I wasn't ready to get divorced. The X-Pro2 is still a top of the line camera and I see no reason to leave; maybe I just need a little marriage counseling. A reset button.

So with that in mind, I reset the camera to its factory defaults. A fresh start. Next, I opened the manual and went through every setting as if I had just purchased the camera. Lastly, I revisited that blog post from 2016 and compared those settings to what I had just done. Surprisingly, they matched up, with only one exception. I now use both Electronic Shutter (ES) and Mechanical Shutter (MS) depending on the situation. Most notably when using an electronic remote cable release, the camera must be set to MS.

There is no need to run through the initial settings again, you can go back and read them, however, I do want to talk about some choices I made that weren't available in 2016 when I wrote that initial blog post.

1. Copyright info in EXIF data. This allows you to register the photographer's name and the copyright holder's name in advance so that the camera automatically adds the information to EXIF data for each image. 

I take the opportunity to add my email address instead of using my name twice.

2. Addition of "Eye Sensor + LCD Image Display" in the View Mode. This isn't an option I use all the time, but it does have some advantages, especially when shooting landscapes or if you need to compose a photograph while holding the camera away from your eye.

3. Voice Memo function. While not available during shooting, this function allows you to record a 30-second voice memo while in the playback mode. This is useful if you need to record a name or something special about a photograph without having to write it down.

Maybe, in the end, this is really more of a creative reset and I'm using the camera as an excuse. Nothing wrong with that. 

Finally, another new feature now available is support for backup/restore of camera settings via FUJIFILM X Aquire. In the future, if I want to reset, I will no longer have to return to zero, I can just return to my proven settings that match my shooting style.

SALTON SEA - A PHOTOGRAPHIC STUDY IN BLACK AND WHITE

Salton Sea State Recreation Area. 1/640 @ f8, ISO 200.

I don't exactly remember when I first became aware of the Salton Sea. It may have been something I read, or perhaps I saw a news report or documentary, but I do remember being fascinated by this place.

A few weeks ago I finally had an opportunity to spend a day exploring a few of the communitites that remain.

North Shore. 1/750 @ f8, ISO 200

Heading first to the Salton Sea Recreation Area, I had to pass through North Beach and the desolation became apparent. Empty lots where houses would never be built, abandoned gas stations, motels, and stores are the first thing I noticed, and what I expected to see. 

North Shore. 1/640 @ f9, ISO 200

However, the recreation area was a surprise. It seemed like many other recreation areas throughout the country, campsites, a camp store, small beach with pavilions, picnic tables, and grills.

Salton City. 1/350 @ f11, ISO 200

But like all the other locations I would visit over the course of the day, something seemed slightly off. Maybe it was the lack of people or the overall sense of failure. I don't mean failure of the people that remain, but the failure that comes from a dying sea. The failure to sustain life due to an increase in salinity and pollution over the years. 

Salton Sea Beach. 1/240 @ f8, ISO 200.

I knew before I took my first photo that I would present them in black and white. Even in color, there is a monochromatic look to the area. I also shot all the photographs with the same lens, a Fujifilm 16mm, f 1.4, and from a similar height. That common perspective is what I was looking for in order to make this a series. 

Salton Sea Beach. 1/750 @ f8, ISO 200.

With a large waterfront in one direction and mountains in the other, I can see why people were drawn to this location. And perhaps if you look deeper, why some people reamain.

Desert Shores. 1/340 @ f8, ISO 200.

I never made it to Bombay Beach or Slab City and did not interact with any people. I hope to change that if I have the chance to return. Mostly the people. I'm curious what it is like to live on the Salton Sea. And I know it is people that will add a warmth and bring my photographs to life. Maybe even show that the Salton Sea really is alive after all.

Desert Shores. 1/250 @ f8, ISO 200.

BEHIND-THE-SCENES TOUR AND FUJINON 16-55MM FIRST LOOK

The first stop on the tour was the glass-floored walkway located at the very top the terminal. Several small open windows gave me this grand view of the terminal's main concourse, including the famous terminal clock located above the information booth at center. Fujifilm X-Pro2 with a Fujinon 16-55mm lens. 1/60 @ f2.8, ISO 2000.

I recently had the opportunity to take a "hard hat" tour of Grand Central Terminal (not station) while in New York City for the annual Photo Plus Expo. I am constantly amazed at the opportunities I get because of my camera.

And also because of the people I know and have met because of the camera, which is how I found myself on this rare tour of the busiest train station in the country. My good friend is the photographer for the Metropolitan Transportation Authority and he set this up for me, something that I've been looking forward to since he first introduced me to Metro-North Railroad's treasure of a tour guide Dan Brucker several years ago.

This abandoned railcar located on track 61 was used by FDR during his presidency to transport him, already seated in his Pierce Arrow limousine, to a private station located under the Waldorf Astoria hotel. Fujifilm X-Pro2 with a Fujinon 16-55mm lens. 1/15 @ f2.8, ISO 6400.

To be clear, I wasn't the only person on this tour and these photos are not exclusive, but it is far from common to have this kind of access and I took the opportunity seriously. That started with renting a Fujinon XF 16-55mm f2.8 R LM WR lens from Borrowlenses.com. I knew that the three and half hour tour would be fast paced and I didn't want to change lenses. I also don't own anything longer than the Fujinon XF 35mm f2 R WR, so a zoom made perfect sense, especially one that is f2.8 throughout.

And it is quite the lens. It had a solid feel, was tack sharp and handled the low light great. However, it was also very big and for me, that size becomes an issue when paired with my X-Pro2. This is similar to the Fujinon XF 16mm f1.4 R WR, another solid, tack sharp lens, but big. What I really love about the X-Pro2 is that people hardly take notice that I'm carrying a pro camera. Adding a big lens on the front, no matter how great it is, takes away from that myth.

The secret sub-basement known as M42 is 13 stories below Manhatten, doesn't exist on any plans and still houses massive electrical converters dating from WWII. Like the railcar photo above, monochrome just made sense. Fujifilm X-Pro2 with a Fujinon 16-55mm lens. 1/15 @ f2.8, ISO 1250.

Of course, if stealth on the street isn't an issue, then you will love this lens. And I really do like this lens and considering that I also use my X-Pro2 for all kinds of photography, it may still find it's way into my bag. But before I do that, I'm going to give the Fujinon XF 18-55mm f2.8-4 R LM OIS, a lens I first used paired with the X-T1 during seven days of shooting in the San Francisco area, another try.

You may also notice that all three photos I chose to include in this post were taken with a focal length of 16mm. So did I really need the zoom? Purely coincidental, I assure you that I did take some photos at other focal lengths.

If you find yourself in New York, take a few hours and visit Grand Central Terminal. Even if you can't get a behind-the-scenes tour, there is plenty to explore and photograph.