DEJA VU COVERAGE - SAME PHOTOGRAPHS, DIFFERENT DAY

When Dr. Robert Ballard, probably most known for the discovery of the RMS Titanic, stepped in front of a screen depicting the future of underwater exploration, I knew I had my photograph.
If you are a corporate photographer and find yourself taking pictures in the same location over and over again, then this post is for you. If you are an event photographer that returns to the same location over and over again, then this post is for you. And if you are either one of these photographers and want to create unique pictures every time you are at this location, then this post is for you.

In my case, I am responsible for covering ceremonies, conferences, and speakers in our corporate conference center several times a month. Everyone from famous oceanographers, Nobel Prize winners, four-star admirals and generals, authors and scientists have passed through and while the presentations are fascinating, it is the same venue, same light, same big screens, etc. You get the picture.

When a Time Magazine cover featuring Albert Einstein appeared on screen I knew that it would make a different photo of Nobel Prize physicist Dr. William D. Phillips.
In this post I'll focus mainly on covering speakers and presentations as opposed to events. So how do I make that interesting or different when I've been shooting in this location for eight years?  Well read on.

On the surface it would appear that nothing changes expect the person and that would seem like the big disadvantage, right? Not really. Your first advantage is that the basics of the environment doesn't change, which means your exposure doesn't really change. I know that I'm going to put my camera on manual with a shutter speed of 100, f-stop around 3.2 and an ISO of 1600. Now that might change just a bit on occasion depending on whether the speaker remains in the front of the room or moves around. But in any case it will only change a stop or so in either direction.

It wasn't until the final slide of his presentation, which featured the cover of his new book, that I felt I had a usable photo of Dr. Peter W. Singer.
The second advantage, and this will save you time in post processing, is you can assign a custom white balance and forget it. As I'm walking up the stairs to our conference center, I set my camera as stated above and make sure that my camera's white balance is set on custom. Now when I enter the room all my attention is on how I'm going to make these images different from the previous ones. All the technical issues were solved years ago.

Which brings us to the title of this post, the fact that you really are shooting the same scene over and over and the changes you are looking for can be subtle.

The dark slide behind former Chief of Naval Operations Adm. Gary Roughead provided nice contrast with his uniform.
More than 90% of the speakers have some type of Power Point slides or video they use during the presentation. You can use those slides to your advantage. Since I am able to include a large video screen in my frame whether I'm shooting from the left or right, I wait for a slide that in some way works visually with the speaker. It could be a graphic or have strong color and because you control the depth of field, it is your decision on how much you want the viewer to know. If it's the title slide or has words that help identify the speaker, then a little deeper depth of field is the answer, or if it is a graphic element or strong color, then shallower normally works.

Professor and complex network theorist, Dr. Albert-Laszlo Barabasi, had some complicated slides so I opted for a  shallow depth of field and waited. 
In one sense I'm fortunate that I have those video screens to use since they do provide endless opportunities. So what if you don't have anything like that? If that was the case, I would most likely place a colored gel and strobe the background to add some punch. Or maybe place some temporary art on the wall that you are confident you could use as visual elements. That's assuming this is a space that you control.

I realize every venue is different, so the key is to figure out all of the basics first, such as shutter speed, white balance and f-stops. The real point is that if you are required to photograph in the same location, then master that location, embrace that location and most of all, be creative in that location. You don't have a choice, right?

LIGHTROOM & BLURB: PERFECT TOGETHER

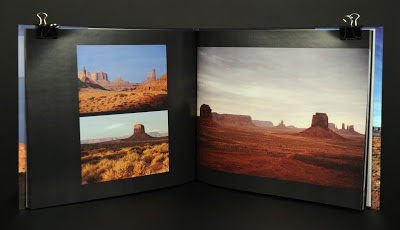
I received a copy of my first photo book published through Blurb.com and thought I would share the experience with you. I'll state right up front that publishing a one-off photography book is not inexpensive, but to see and be able to present your art in book form, I believe it's well worth the investment. I've received  positive reactions from everyone who has looked at the book. And not just a positive reaction to the photographs which is the ultimate goal, but also to the quality and printing of the book itself. I've shared many of these photos online, but handing someone a physical book still elicits a very different response.

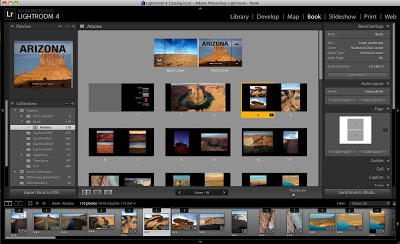
To back up just a bit, this was the first photo project where I made the decision upfront to use Adobe Lightroom 4 exclusively from start to finish. This was a key decision because in Lightroom 4 a new book module was added, making it only natural that I experimented with that as well.

Screen shot of book module in Adobe Lightroom 4.
Screen shot showing the book module in Adobe Lightroom 4.
This post isn't meant to be a step-by-step guide on using Lightroom 4 to create a book, there are already plenty of tutorials out there, including some at blurb.com, but I will highlight a few that I found incredibly helpful and also discuss how I got started.

As I imported my photos into Lightroom, I placed them in a collection I named Arizona. Within the Arizona collection, I created a collection set named book. As I rated my photos, everything that received three stars or more, was moved to the book collection. In the book module I selected a large landscape (11x13) book with hardcover and dust jacket on premium lustre paper. Total cost was $86.19 for the 60 page book, although I did receive a first time publisher discount, so the total with shipping actually cost around $76.00.

The first video tutorial I found helpful was How to Create a PDF Folio produced by Ibarionex Perello of the Candid Frame podcast and it provided a great explanation on using templates and favorites to quickly get started. The only difference with this tutorial is that in the end he exports his book as a PDF instead of uploading to Blurb.

The second video was Creating Your Own PhotoBook in Lightroom 4 by Scott Kelby. This video is part of the Kelby Training series and is available as a $9.99 rental if you are not a subscriber. And while I'm sure there are many free options, Scott is just a great instructor and he really saved me with his workarounds for creating a custom front cover.

A variety of templates makes it easy to customize your book.
One thing to point out is that there currently is not an option to upload custom templetes, which some see as a frustration. At first I was a little frustrated by this as well, however there really are hundreds of page templates available and I'm not sure I would have designed anything better for the interior pages that was not already available.

Designing the front cover was another story however. This is the one place that I thought there could be more custom options available. That is until I watched Scott's tutorial and saw that from Lightroom he opened the image he wanted on the cover in Photoshop, created his custom design, the saved it back to Lightroom. Then you just drag that image to a basic cover template and it's done. In my case it took one or two tries so that I could get the alignment right for the wrap-around of the dust jacket.

If you have photos you have always wanted to share or present in a different way, I would encourage you to spend time in the Lightroom's book module and let your creativity flow. And please, feel free to share your Blurb books with me.

HISTORICAL ASS?

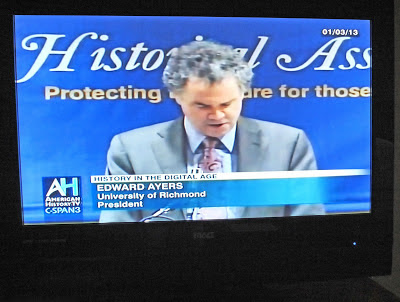
The designer of this background didn't take into consideration how it would appear when viewed on television.

I'm sure the president of the University of Richmond was unaware of what television viewers saw behind him during a C-SPAN3 broadcast of a panel discussion on History in the Digital Age, but it sure caught my eye. Also, I'm sure that no one who was present in the audience that day was aware. And just maybe, if I hadn't put it in the title of this blog, you too would be wondering why I posted this picture?

In all things photography, both still and video, you must always be aware of the background. In this case the Historical Association's banner placed behind the speaker would at first seem like a good promotional idea. But did anyone check what the background would look like when viewed at 16:9 on television? I'm pretty sure they didn't.

In most cases a photographer scans the background looking for a pole or tree branch poking out from behind a head. In other cases it is making sure nobody is flipping the bird or photobombing during an interview.

In this blog I'll talk about photographing a conference, something I do quite often, where having a dynamic background, preferably with the conference title, can add interest and help tell the story, and where a poorly designed background can present all types of problems.

Same conference background viewed from two different angles works equally well in both instances. Bill Nye the Science Guy, left, and Secretary of the Navy Ray Mabus speak at the Naval STEM Forum in 2010. This background presented many interesting possibilities regardless of the angle I shot from.
Tips for those designing backgrounds.

1. Take into consideration all the angles that photographers will be shooting from.

2. In backgrounds, size does matter. If too small it will look strange when photographed using a wide angle. Too big and the speaker will get lost.

3. The speaker will get lost if the background is too bright, either by color choice, or over lit by the production crew. If the background is too busy, it could detract from the subject.

4. Keep in mind that the video camera is probably on a riser in the back of the room shooting straight on, while still photographers are shooting from a lower angle.
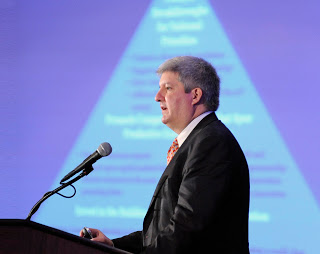
Choose a shallow depth of field when using background screen as a graphical element.
Video screen showing presentation in background adds graphical interest to otherwise static photograph of Mr. Thomas Kalil, Deputy Director, White House Office of Science and Technology Policy.
Tips for photographing backgrounds.

1. Work with the background by varying your angles to add interest. Make it work with the photograph by incorporating or isolating portions. Be selective.

2. If there are video screens off to the side, see if the imagery or graphics can be used to enhance interest. Emphasize patterns in these slides by using a shallow depth of field.

3. If possible find a way to elevate yourself, such as shooting from a riser or using a ladder, to put yourself at eye level. If the background was designed to be viewed this way without many options, then put yourself in the same position.

4. If the background does not work at all, or if there is no background and just a curtain, do your best to avoid leaving a black hole behind the speaker. Shooting from an extreme low angle to include overhead lights or spots can add interest, or shooting from slightly behind the speaker and including the audience is a good idea.
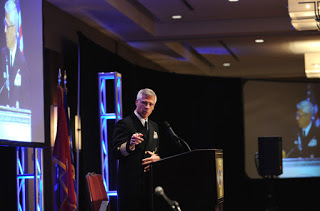
Using video screens as backgrounds can be tricky if not handled correctly.
Besides presentations, video screens often will show the speaker, especially in large venues. In this photo the screen on left was directly behind the speaker and just didn't look right if photographed straight on,  however when taken from the side and including another screen, I think it frames the speaker, Rear Adm. Matthew Klunder, chief of naval research, nicely while adding interest. 
Whether you are designing a background, have input into the design, or are the photographer assigned to cover a conference, take into account all the possibilities and most importantly, if your organization or company's title includes the word "Association," BE CAREFUL!

5 PHOTO TIPS FOR SHOOTING ANTELOPE CANYON

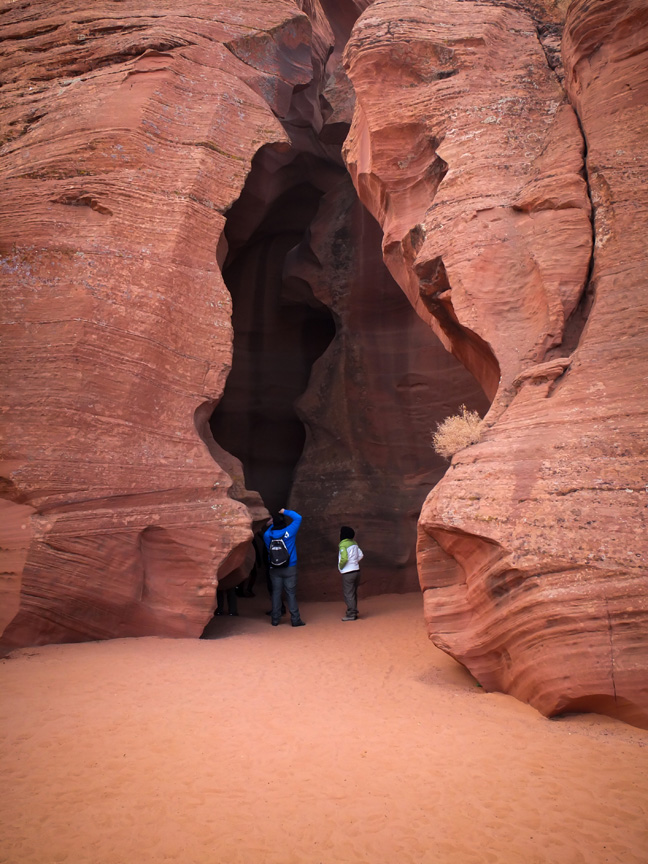
The entrance to Upper Antelope Canyon.

The entrance to Upper Antelope Canyon.

Located about ten minutes outside Page, Ariz., Upper Antelope Canyon is one of those magnificent natural wonders that should be on every photographer's must shoot list.

An authorized Navajo tour guide is required to gain access and while there are a number of tour operations available in the Page area, I choose Roger Ekis' Antelope Canyon Tours and specifically signed up for the photographer's tour. Most of the tour operations offer some sort of a photography option which will cost you a little more money, but does give you more time on location, ensures that you can use a tripod, and most importantly, means you are with other photographers whose sole purpose is the same as yours.

This was my first and only visit to Upper Antelope Canyon and I spent a total of two hours taking photographs. I mention this because I don't want to give the impression that I know everything there is to know about photographing here. However, I think you will find these five tips useful if you ever get the opportunity.

Photographed with a 10.5mm lens and corrected in Adobe Lightroom 4.

Photographed with a 10.5mm lens and corrected in Adobe Lightroom 4.

1. Take your time. You've anticipated this shoot, have seen incredible images taken by others and know that you have limited time, so you can't wait to drop the tripod legs and begin shooting. In our case, we walked immediately to the back of the canyon where it is much shallower and more cave-like with less light reaching the canyon floor. We then proceeded to shot while working our way back to the entrance. Two hours doesn't seem like a long time, but you don't have to make all your images in the first ten minutes either. Also in this case, I think the better shots are closer to the entrance of the canyon where it is wider, brighter and the sunlight filtering down from 120' above brings out the most colors and patterns in the sandstone walls. So use your first half hour of time to get used to shooting in this environment and don't rush.

My guide tosses a handful of sand onto a ledge creating a nice visual effect as it then "flows" over the edge.

My guide tosses a handful of sand onto a ledge creating a nice visual effect as it then "flows" over the edge.

2. Cooperation and communication are key. You will be shooting alongside other photographers in addition to sharing the canyon with other tours so you need to be cognizant of that. Your guide can help by warning when other groups are approaching or maybe even assist with moving lingerers along, but mostly it will be up to you to plan, frame and execute your shot, then get out of the way for others. Again, don't rush and with four photographers in my group it never was a problem getting the shots that I wanted. Rely on your guides advice, they have been visiting this location for years, observing it in different light and at different times of the year and can quickly point out the best shots or locations. I know you want to discover a shot that has never been made before, but with the limited time, a little assistance goes a long way. It is still your photograph the moment you release the shutter. 

Detail pointed out by the guide is only seen by looking straight up. 

Detail pointed out by the guide is only seen by looking straight up. 

3. Environmental awareness. When looking at the photographs, they look bright and colorful as if there was a lot of available light. Don't be fooled, the average exposure time for all of these shots was 1/2 a second. It's not so dark that you can't see, but it is dark enough that focus can be an issue. In fact, it was the one thing I had the hardest time with. Other than a tripod, I highly recommend that you bring a flashlight to not only assist with setting up your camera but to shine on the walls in order to assist with focus. Again be aware and courteous to other photographers. I started off at ISO 200, but found that my exposure times were too long, especially when shooting two stops under while bracketing, so I ended up shooting mostly at ISO 400 and in some cases ISO 640. It does get brighter nearer the entrance and I was back at 400. 

Having the right equipment, including a tripod and remote shutter release, are essential.

Having the right equipment, including a tripod and remote shutter release, are essential.

4. Equipment. I went with a Nikon D3S attached to a Gitzo tripod and three lenses, the Nikon 10.5mm, Nikon 14-24mm and the Nikon 24-70mm. Most of the photos were shot using the 14-24mm and the 24-70mm. In my backpack, I also had a Nikon D700, Nikon 70-200mm VR, and an SB900 flash, but really should have left those in the car. My advice, bring the widest, fastest lens you own. The canyons are narrow and as mentioned before, there are other people moving by and you really want to concentrate on taking photos and not worrying about gear or lens selection. The floors of the canyon are covered in sand which gets stirred up as people and you move about, so be cautious if you change lenses and be sure to have a lens cloth handy. Lastly, I was using a pocket wizard plus to trigger my camera, but only because I didn't have a cable release. If you don't have a way to release the shutter remotely, use the self-timer. 

Three shot bracket inside Upper Antelope Canyon.

Three shot bracket taken at -1.0, 0.0 and +1.0. 

5. Take plenty of photographs at various focal lengths and multiple f-stops. Almost everything I shot during my two hours was bracketed by either three or five stops. Originally I thought I would process these photos using the high dynamic range or HDR technique, however, in the end none were. The bracketing was critical though when it came to selecting the best exposure to process. I would shoot the multiple exposures, check focus, then shoot another sequence.

As I mentioned at the start of this post, this was my first visit to the canyon so I only have this one brief experience photographing in the mid-December light. The look in this canyon will change depending on the time of year, so if you want to photograph shafts of light then you will need to visit during the summer months. Of course during the summer you will also contend with large crowds which would certainly add to the anxiety of getting the photographs you want.

In addition to Upper Antelope, there are other slot canyons in the area including, Lower Antelope, Canyon X or Cardiac Canyon. These locations are less frequented, meaning they are also less photographed, so would offer additional opportunities to produce never before seen images. Apparently some of these canyons do require hiking and more time, so they are not as accessible as Upper Antelope.

And don't forget to just stop, take the camera away from your eye and absorb the surroundings. As photographers we often get caught up in the scene and forget to just take a moment and enjoy what is around us. While we tell ourselves that we will have the photographs to remember it by, nothing compares to being there. More on this in a future post.

Additional tour companies to consider:

http://www.overlandcanyontours.com/

http://www.lowerantelope.com/

For more information on Navajo Nation Parks & Recreation visit http://www.navajonationparks.org/

PHOTOGRAPHY COPYRIGHT TUTORIAL

You hear it often. Copyright your photographs. However, it often ends there, with just the suggestion. So I decided I would record a tutorial on the process I go through to copyright images, in this case photographs from my recent trip to Arizona.

When discussing copyright and all the issues surrounding it, I think it is important to mention that I'm not a copyright lawyer or expert and only know what I've read or heard from those that are. I also see many message boards and comment sections that discuss copyright, however, I would avoid putting too much stock in those and instead just visit a site such as thecopyrightzone.com by Edward Greenberg and Jack Reznicki to get the facts.

This tutorial is in two parts. First, I go through my work flow of preparing the photos for upload and in the second part, I take you through the process of actually uploading the photographs to the U.S. Copyright Office.

Some things to keep in mind:

As the photographer you automatically own the copyright to the photograph unless you sign it away in writing. The one exception is if you are a full-time employee, then the employer owns the copyright as a "work made for hire."

Registration is required if you intend to file a lawsuit. If you registered you work before the infringement, or within three months of publication, then you can sue for statutory damages plus attorney fees.

Using © is no longer required, however you may still use it to clearly identify yourself as the copyright holder. How do I make that fancy © symbol? Option G on a Mac, Alt + 0169 on Windows and © in HTML.

While I don't copyright every photograph I take, I do when I intend to make the photographs commercially available or if I believe others may do the same without my permission.

Most of my photographs, even ones that I have previously copyrighted, are available through a creative commons Attribution-NonCommercial-NoDerives license. This allows others to download my photos and share them as long I'm given credit, but cannot alter them or use them commercially.

Additional resources:
Editorial Photographers web site.
Visit www.copyright.gov for a step-by-step tutorial